
How To Set Up Website Conversion Tracking With GTM (Google Tag Manager) And Google Analytics.
Whether you're a website designer looking for help setting up Google Tag Manager and Analytics, or a business owner who wants to know how many site visitors and where your website conversions are coming from. This guide will help you easily set up website conversion tracking with GTM for your WordPress, Shopify, and Bigcommerce website. It will also works for numerous other platforms as well, these are just the ones that we utilize for our website design clients.
Learn the easy way to set up website conversion tracking with WordPress, Google Tag Manager, and Google Analytics.
In this step by step guide, we are going to show you a couple of ways that you can track four different conversions. Website form submissions, email signups from 3rd party forms, phone calls from hyperlinks, and lastly, emails you receive from hyperlinks on your website.
Steps for setting up website conversion tracking with GTM and Analytics.
Setting up Google Tag Manager with your website and GA.
Setting up Google Tag Manager (GTM) with your website and Google Analytics (GA) is essential for tracking user interactions effectively. Follow these step-by-step instructions to integrate both tools successfully.
Step 1: Create a Google Tag Manager account.
- Sign in to GTM:
- Go to Google Tag Manager and sign in with your Google account.
- Create an Account:
- Click on "Create Account."
- Enter an Account Name (e.g., your business name).
- Select your Country.
- Check the box for data-sharing settings as desired.
- Set Up a Container:
- Enter a Container Name (e.g., your website name).
- Choose the target platform (e.g., Web).
- Click Create and accept the terms of service.
Step 2: Add the Google Tag Manager code to your website.
- Copy the GTM Code:
- Once the container is created, you'll see two snippets of code.
- Copy the
Tracking website form submission with Google Tag Manger.
Below are the steps to set up conversion tracking for all of your website forms using GTM. This is the simplest way we have found to track website form submissions via WordPress, Shopify, Bigcommerce, and other web platforms.
First you are going to want to create a "Thank You" page on your website. For best results we suggest you noindex this web page so that people can't find it in search, skewing your conversion results.
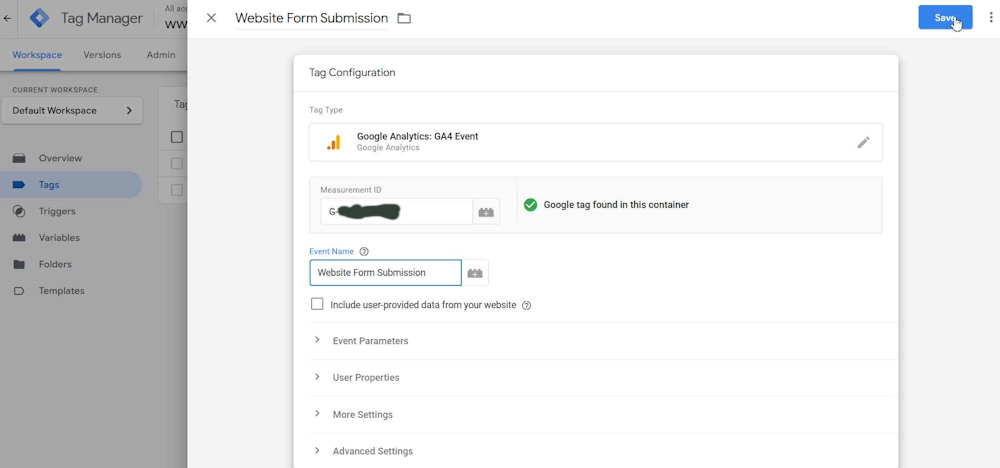
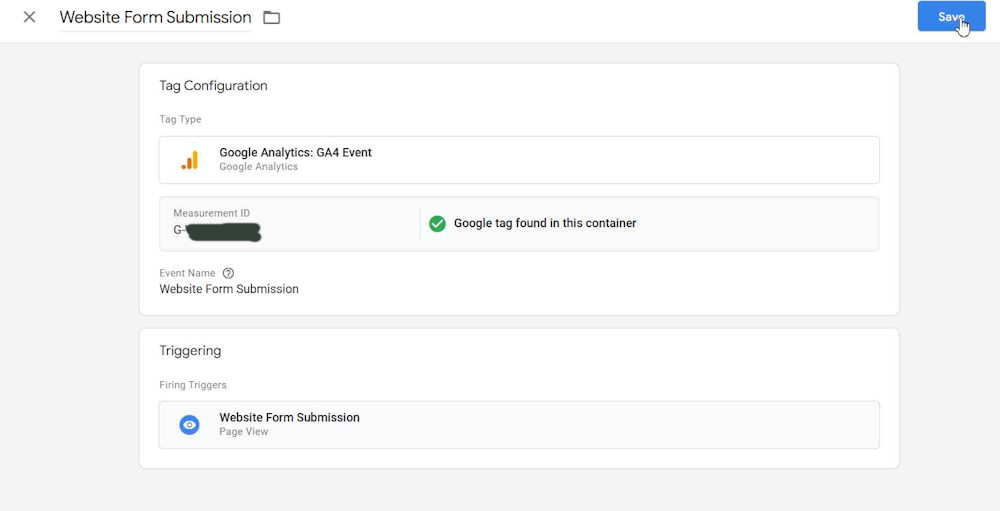
Now in GTM, add and title your new tag. We typically use something like "Website Form Submission" or similar.
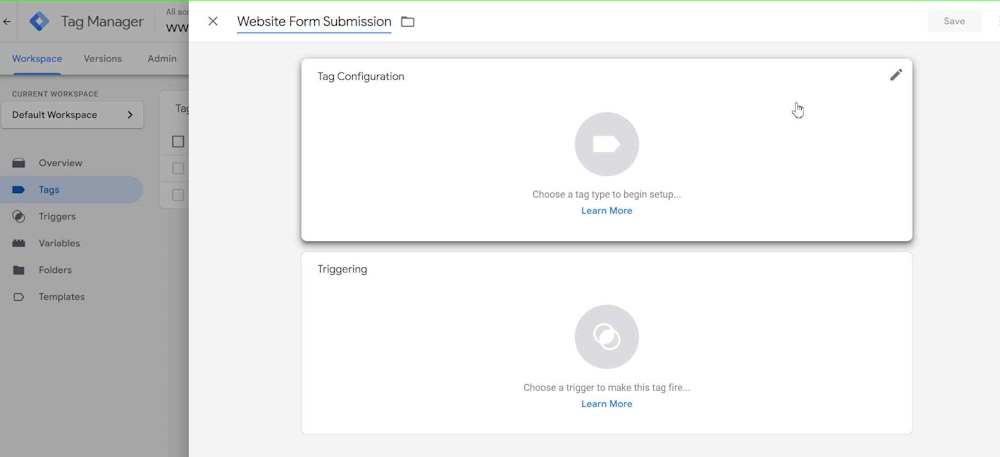
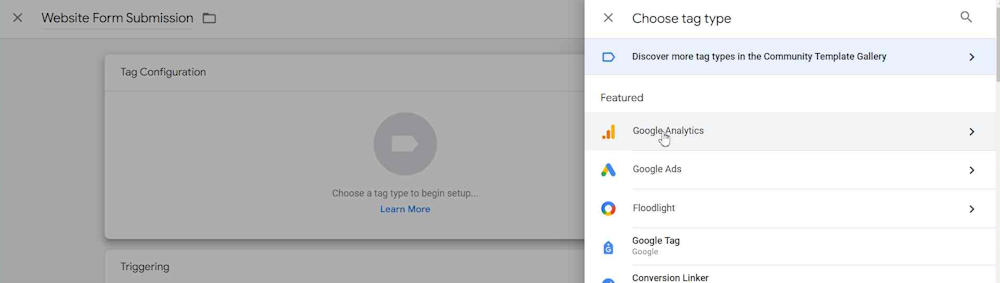
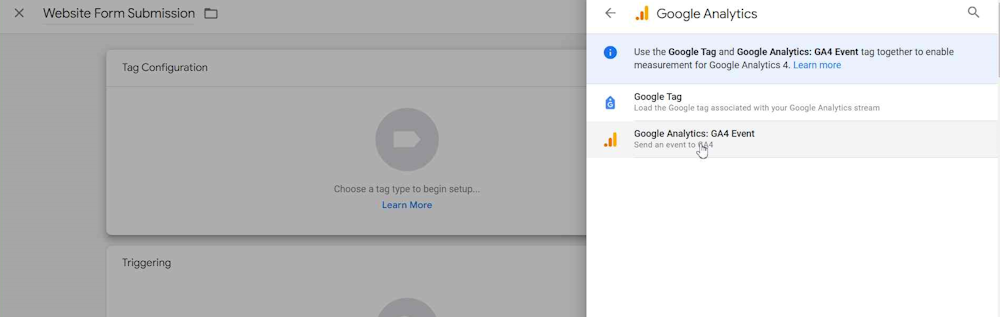
Click tag configuration, and select Google Analytics. Then select Google Analytics: G4 Event.
Now, go to Google Analytics and get your measurement id. This can be found in Settings > Data Streams. Paste this measurement ID in the empty box.
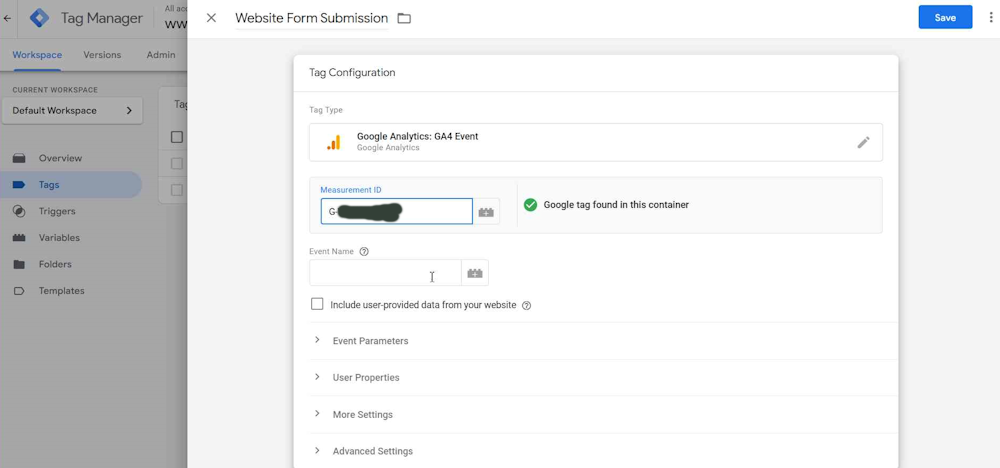
Next, add the event name. We typically use the same name as the tag. In this case "Website Form Submission."
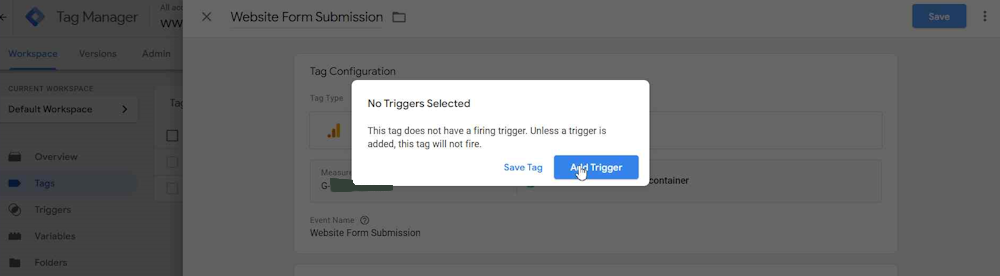
Next you are going to want to create the trigger that will fire off the Google Tag that will track this conversion.
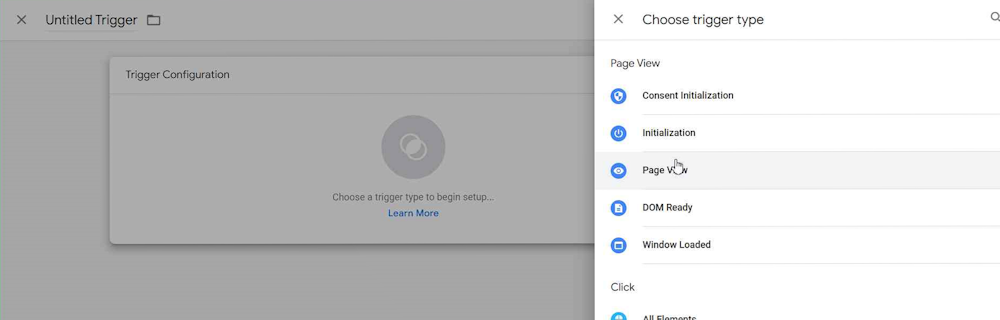
Now, select "page view", since we are going to be using a "Thank You Page" url to fire this trigger.
Since we don't want all pages to fire this trigger, you are going to need to select "Some Page Views" and select "Page URL" to fire this trigger. You also need to leave the middle section as "contains".
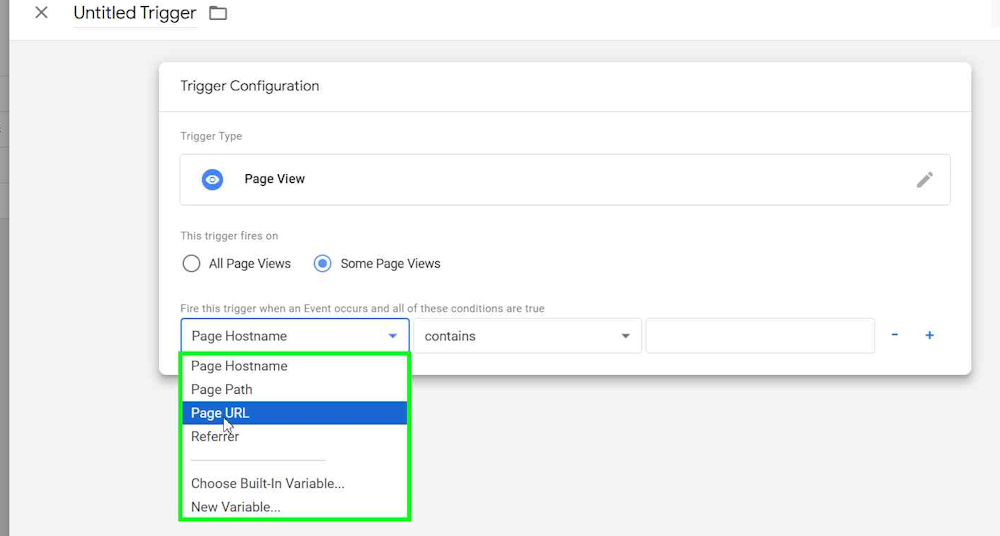
Next you are going to want to enter the page you will be redirecting your website form to. This is what will fire the trigger, sending a conversion to Google Analytics.

Name your trigger and click save.
Now you are ready to track website form submissions using a "Thank You Page".
Website conversion tracking with GTM for email signup forms.
Most email marketing software and plans track basic analytics that you can analyze. The problem is, these typically only track impressions (how many people see it), and subscribers which is how many contacts you get through your website popup, inline signup, or maybe even a contact form. Most don't tell you where the data, or contact is coming from making it hard to know exactly where you dollars to build your email list are better spent.
Using Google Tag Manager to track email signups through inline forms, web popups, and contact forms can be invaluable when it comes to analyzing your marketing dollars when trying to grow your email subscribers list. At 2Rivers, we use a combination of custom 3rd party signup forms (paperform.co | get the forms here), as well as native popups and inline signups with platforms like MailChimp, Omnisend, and Constant Contact.
For the purpose of this article, we are going to focus on using 3rd party forms (inline, or popup) to show you how you can track email signups with GTM so you can track conversions and know where they are coming from.
Since we are using a "Thank You Page" to track email signups with our 3rd party paperforms, we are going to follow the same steps we utilized above. The only difference being we will create a different thank you page so that the message is different. You can utilize the same page if you would like. We just like the messaging on the landing page to be different.
First you are going to want to create a separate "Thank You" page on your website that is specific to your email signup forms. This allows you to change the messaging on the page since email signups and contact forms are a different type of conversion. Something as simple as, "Thanks for signing up, we promise not to spam" on your email thank you page is more fitting than something like "Thanks for contacting 2Rivers, we will be in touch within 48 business hours". You can also use this page to nudge potential clients to reaching out by phone if that is something you'd prefer by changing your messaging to Thanks for contacting 2Rivers, we will be in touch within 48 business hours, if you need faster assistance, please call us at XXX-XXX-XXXX".
For best results we suggest you noindex this web page so that people can't find it in search, skewing your conversion results.
Now in GTM, add and title your new tag. We typically use something like "Website Form Submission" or similar.
Click tag configuration, and select Google Analytics. Then select Google Analytics: G4 Event.
Now, go to Google Analytics and get your measurement id. This can be found in Settings > Data Streams. Paste this measurement ID in the empty box.
Next, add the event name. We typically use the same name as the tag. In this case "Website Form Submission."
Next you are going to want to create the trigger that will fire off the Google Tag that will track this conversion.
Now, select "page view", since we are going to be using a "Thank You Page" URL to fire this trigger.
Since we don't want all pages to fire this trigger, you are going to need to select "Some Page Views" and select "Page URL" to fire this trigger. You also need to leave the middle section as "contains".
Next you are going to want to enter the page you will be redirecting your website form to. This is what will fire the trigger, sending a conversion to Google Analytics.
Name your trigger and click save.
Now you are ready to track inline email forms and custom popup form submissions using a "Thank You Page".
